How-To Guides
Connect to your broker/prop firm
Add your broker or prop firm as a connection in ETP TradeCopier, verify it connected, and check that your trading accounts imported correctly.
Last verified
Before ETP TradeCopier can monitor or copy trades, it must establish a connection to your broker or trading platform.
Each broker you intend to use must be added as a Connection. Once a connection has been established successfully, TradeCopier automatically imports the trading accounts associated with that broker.
Before You Begin
Before creating your first connection, make sure you have:
- Your broker or prop firm login credentials
- An active internet connection
- Access to the trading account(s) you want to connect
Create a New Connection
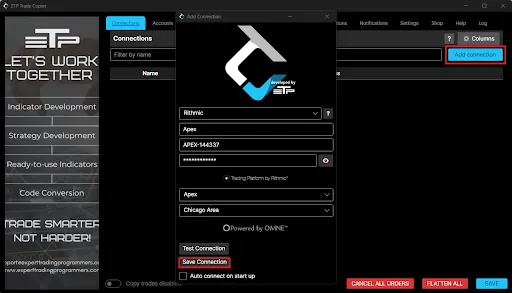
- Open the Connections page.
- Click Add Connection.
- Select your broker or trading platform from the available list.
- Enter the required connection details.
- Click Save.
If the connection is successful, your trading accounts will automatically appear on the Accounts page.
Verify the Connection
After saving the connection:
- Confirm that the connection status shows as Connected.
- Open the Accounts page to verify that your trading accounts have been imported.
- If your broker provides multiple accounts, each account will be displayed automatically.
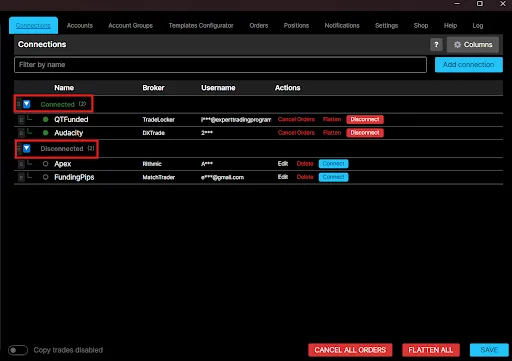
If your accounts do not appear, verify your connection details and try reconnecting.
Supported Brokers
ETP TradeCopier supports multiple broker and trading platform connections like Rithmic, Tradovate, Ninjatrader, ProjectX, Tickblaze, DXfeed, Tradelocker, ctrader, Matchtrader and DXtrade.
Best Practices
- Create a separate connection for each broker or trading platform you use.
- Verify that all connections are active before enabling trade copying.
- Confirm that your trading accounts appear correctly before creating an Account Group.
- Click Save after making any changes.